< Back to Articles
Tying Viol Frets

Place the instrument securely on a table or other flat surface so that the neck extends toward your left.
Remove the old fret by clipping the knot with some fingernail clippers.
Tie the new fret down the fingerboard, (toward the nut). The fret will be pulled up into position when it is finished. This will help to hold the fret tightly on the neck.
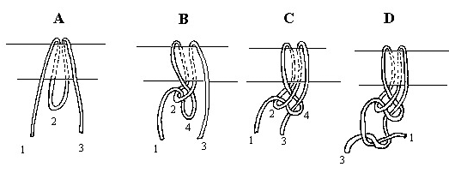
Loop the fret material and slip it under the strings as in figure A. We will call this loop 2. The two ends should be sticking out from the strings toward you. We will call these strand 1 and strand 3. Loop 2 passes around the back of the neck and also faces you.
Make another loop in strand 1. We will call this loop 4.
Pass loop 4 through loop 2 as in figure B.
Now, pass strand 3 through loop 4 as in figure C. Pull the knot tight. Don't worry about getting it too tight. Just pull the gut and settle it so that there is no slack in the fret.
Now, make a simple over hand knot with strands 1 and 3 as in figure D. Pull this knot tight.
Clip the ends of the strands about 1/8 inch from the knot. Use a small flame or soldering iron to burn the ends up to the knot. Be careful not to burn the knot or the instrument!!
If you need to, rotate the fret on the neck so that the knot is more or less at the joint of the fingerboard and neck.
Pull the fret up the neck into position.
